What is
Reverse Polish Notation?
When you are at school you learn that different arithmetic operators have different precedence, although that may not be the exact phrase the teacher uses. You are probably given a mnemonic such as "My Dear Aunt Sally" (meaning
Multiplication,
Division,
Addition, Subtraction) to tell you the order in which to do sums. For example, if you are given:
1 + 2 x 3 = ?
you know to multiply 2 by 3 before adding the 1. Early pocket calculators were not acquainted with Aunt Sally, and would evaluate this expression as 9.
Another school-days mnemonic, BODMAS, tells us to attend to the bracketed expressions first, followed by the usual algebraic operator precedence. Brackets (or more properly parentheses) remove any ambiguity about the order of evaluation of expressions. Many complex expressions would not be possible without brackets. And brackets are often used in computer programming even when they are not strictly required, simply to eliminate confusion. For example:
(1+2) x 3 = ?
is guaranteed to evaluate to 9, whatever precedence rules are applied (or if the programmer has forgotten them). The BODMAS rule is applied recursively; brackets can contain other complex expressions which themselves contain brackets, and so on.
Polish Notation was invented in the 1920's by Polish mathematician Jan Lukasiewicz, who showed that by writing operators in front of their operands, instead of between them, brackets were made unnecessary. Although Polish Notation was developed for use in the fairly esoteric field of symbolic logic, Lukasiewicz noted that it could also be applied to arithmetic. In the late 1950's the Australian philosopher and early computer scientist Charles L. Hamblin proposed a scheme in which the operators follow the operands (postfix operators), resulting in the Reverse Polish Notation. This has the advantage that the operators appear in the order required for computation. RPN was first used in the instruction language used by English Electric computers of the early 1960's. Engineers at the Hewlett-Packard company realised that RPN could be used to simplify the electronics of their calculators at the expense of a little learning by the user. The first "calculator" to use RPN was the HP9100A, which was introduced in 1968, although this machine is now regarded by many as the first desktop computer. Hewlett-Packard continues to develop RPN calculators, such as the HP32 and some of the latest models have the capability of both RPN and algebraic logic.
Once mastered, RPN allows complex expressions to be entered with relative ease and with a minimum of special symbols. In the 1960's that initial effort would have been regarded as a reasonable trade-off. For most calculator users of the time, the alternative was the error-prone practice of writing down intermediate results. Using RPN, it is possible to express an arbitrarily complex calculation without using brackets at all. In RPN the simple example "(1+2) x 3" becomes:
3 2 1 + x
Like a sentence in German, all the verbs come at the end. This notation may look strange at first, and clearly if the numbers were entered as shown you would get the number three-hundred and twenty-one! To make this work you need an extra key that tells the calculator when you have finished entering each number. On most RPN calculators this is called the "Enter" key and fulfills a similar function to an equals key on a conventional calculator but in reverse. So the example would actually be input as:
3 enter 2 enter 1 + x
This gives the correct answer, 9. If you wanted to work out "1 + 2x3" you would input this as:
1 enter 2 enter 3 x + (answer: 7)
You need to think of entering numbers as being like putting plates into one of those spring loaded plate stacking trolleys you get in canteens. Every time you enter a number, it is pushed onto the stack. When you eventually start using arithmetic operators, numbers start "popping" off the stack as needed. You can also push more numbers onto the stack. At the end of the calculation you will have "used up" all the numbers and the stack will be empty.
A calculator using conventional logic will internally convert the expression to the RPN form above. This may be achieved by parsing the bracketed expression before carrying out the calculation. But it is more likely that the calculator logic will be pushing numbers down onto the stack every time a pair of brackets is opened or is implied by the operator precedence. So in effect an RPN calculator is offloading this work to the user, resulting in simpler logic design in the calculator. The technical barriers to using conventional bracket notation in an electronic calculator no longer exist, and yet users of RPN calculators rarely seem to want to move over to the more conventional algebraic logic. Although RPN seems strange to the uninitiated, people who overcome the initial hurdle find it a powerful and elegant tool which is ultimately easier to use.
Using RPN
You can configure the calculator to use Reverse Polish Notation (RPN) using the calculator Options menu and choosing General. The dialog box gives you the option of selecting algebraic logic (the default), as entered (arithmetic operators are applied in the order entered regardless of the rules of operator precedence) or RPN.
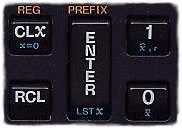
The layout is very similar to the algebraic logic mode. Instead of the = button there is a button marked Ent for "Enter". This is used to enter values onto the Stack. The memory buttons are now called STO (store) and RCL (recall) and pop up a dialogue box to select the memory number. There is a button CLx which clears the value at the top of the stack. Used with the shift button, this changes to drop which discards a value off the stack and drops all the other values down one level, the reverse of Ent.
Example:
1.1 Ent 2.2 Ent 3.3 Ent
4.4
would push the values 1.1, 2.2, 3.3 and 4.4 onto the stack
Repeatedly pressing the + button would pop each value off the
stack in turn, adding it to the total, finally resulting in the answer 11.
It is much easier to learn how to use the RPN functions if you can actually see the stack as operations are performed. To make the stack visible, got to the Options menu and select Display to bring up the display configuration dialog. Check the box labelled Stack. This will make the stack visible for all arithmetic logic modes, including algebraic, but it is most useful when in RPN logic mode. On a desktop computer you might want to re-size the calculator to make the display area taller so that more levels of the stack are visible. On handheld devices it will be necessary to reduce the height or number of buttons to achieve this.
The current value is often referred to as "X" with the next three levels of the stack being Y, Z and T. On early calculators only four levels were available. The stack fills upwards, despite the fact that we tend to refer to the X value as the "top" of the stack. After the level "T", we do not use labels further down the stack, but there are actually 15 levels available, which is more than any real calculation is ever likely to require. In practice you might leave values on the stack between calculations and gradually fill it up. In this case the extra values at the bottom of the stack would eventually be lost, but this is not a problem because it is extremely unlikely that they would be required in a calculation.
There is a register exchange button,
x><y
which switches the top two values in the stack. When used with the shift button, this changes to last, which can be used to retrieve the last result. And the stack
roll down
button Rvwill rotate the contents of the stack downwards, so each value moves down one level and the current "X" value is moved from the top to the bottom of the stack. You can use it in combination with the shift button to reverse the direction of stack roll ( R^ ).